Panoramic images
Introduction
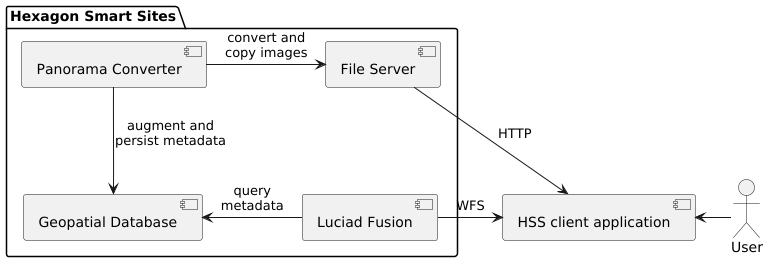
HxGN Smart Sites provides the capability to visualize the positions of panoramic images on the map. By selecting a panorama icon on the map, users can load and interact with the panoramic image.
To display panoramic images on the map, they must first be converted to the Luciad Panorama Format. This conversion is achieved using the Panorama Converter tool, which processes the images and stores the associated metadata in a spatial database.
The LuciadFusion instance is responsible for hosting the metadata. Meanwhile, a file server is utilized to host the images themselves.
The HxGN Smart Sites client application integrates this information to effectively display the panoramic images on the map.
To set up panoramic images in HxGN Smart Sites, follow these steps:
- Convert the panoramic images to the Luciad Panorama Format using the Panorama Converter tool.
- Host the panoramic images on the File Server.
- Create a WFS service in LuciadFusion to host the panorama locations.
- Set up a Panorama Datasource and create a publication in the HxGN Smart Sites Admin Client.
- Verify the panorama publication in the HxGN Smart Sites Client.
Panorama Converter
The Panorama Converter tool transforms panoramic images from their original formats into the Luciad Panorama Format. This process not only converts the images but also inserts the related metadata into a database.
Supported Databases
The tool is compatible with the following databases:
- PostgreSQL
- Oracle Database
- Microsoft SQL Server
Supported Panorama Types
The tool is compatible with the following types of panoramic images:
- TruView
- LGSx
- Pegasus
- E57
Preparation Steps
Before using the Panorama Converter tool, you must prepare a database configuration file with your database connection details, including username, password, and database name. You can use any of the supported databases, but in this example, we will use the PostgreSQL instance provided with HxGN Smart Sites.
Example: Creating a PostgreSQL Database
Follow these steps to create a new database in PostgreSQL:
- Create a User and Database:
Execute the following SQL commands as a user with database creation privileges
CREATE USER panos;
ALTER USER panos WITH PASSWORD 'panos-password';
CREATE DATABASE panos WITH OWNER panos;
GRANT ALL ON SCHEMA public TO panos; - Enable PostGIS Extension:
Execute this command as a user with superuser privileges on the
panosdatabase:CREATE EXTENSION postgis;
Configuring the Database
The Panorama Converter tool includes sample configuration files for each supported database type: sample-cubemap.pgs, sample-cubemap.ora, and sample-cubemap.mss.
- Choose the file corresponding to your database type and copy it to a new file named
cubemap.pgs,cubemap.ora, orcubemap.mss. - Update the file with your specific database connection details, such as host, port, username, password, and database name.
Running the Panorama Converter Tool
- Find the Panorama Converter tool within the HSS release.
- Make sure to copy the HSS license file to the
/libdirectory of the Panorama Converter tool. - Run hss-panorama-converter script using the following properties:
inputspecifies the entrypoint of the panorama data:type entrypoint TruView swlocation.xml or cubemapmeta.xml LGSx *.lgsx Pegasus External orientation.csv E57 *.e57 The input can be either a single file or a directory containing multiple files. dbspecifies the database configuration fileoutput-directoryspecifies the directory where the converted panoramas will be stored. The output directory is also persisted in the database.
Sample command
hss-panorama-converter.sh --input=lgsx/E0220_000_241015.lgsx --db=cubemap.pgs --output=my-panos
On Windows use hss-panorama-converter.bat instead.
Additional Help
For more detailed instructions, refer to the README.txt file located with the panorama converter script. Running the tool without arguments will provide additional help and usage information.
File Server
Copy all the generated output folders to the "static files location" configured for the file server. Write down the base URL on which the panos are available. Don't include the entered output directory.
More information on configuring the file server can be found in the installation manual.
WFS Service
To create a WFS service in LuciadFusion that hosts the panorama metadata, follow these steps:
- Log in to LuciadFusion.
- Open the LuciadFusion data tab and upload your database configuration file.
- Select the uploaded database configuration data item and click on
Create Service. - Change the Service Type to
WFSand clickCreate. - After the service is created, write down the Service URL. You will need this URL later.
HxGN Smart Sites Admin Client
To set up a Panorama Datasource and create a publication in the HxGN Smart Sites Admin Client, follow these steps:
-
Access the HSS admin application using a user account with admin privileges.
-
Create a Panorama Datasource:
- Navigate to the
Datasourcestab and clickCreate. - Enter the following details:
- Datasource Title: panos
- Datasource Protocol: Panorama
- Datasource URL: [Paste the WFS URL copied earlier]
- Security Option Type: Token
- Images Base URL: [Paste the file server URL copied earlier]
- Click
Saveto create the datasource.
- Navigate to the
-
Create a Publication:
- Navigate to the
Publicationstab and clickCreate. - Enter the following details:
- Publication Title: panos
- Datasources: Select the datasource you just created.
- Roles: Only users with these roles will be able to consult the publication.
- Click
Saveto create the publication.
- Navigate to the
HxGN Smart Sites Client
To verify the panorama publication in the HxGN Smart Sites Client, follow these steps:
- Log in to the HxGN Smart Sites client application.
- Load the panorama publication.
- Verify the panoramic images by clicking on a panorama icon on the map.